还是再来了解一些springboot
spring boot自述 spring boot
数据库准备 1 CREATE DATABASE springbootdb;
创建表 1 2 3 4 5 6 7 8 DROP TABLE IF EXISTS `city` ;CREATE TABLE `city` (`id` int (10 ) unsigned NOT NULL AUTO_INCREMENT COMMENT '城市编号' ,`province_id` int (10 ) unsigned NOT NULL COMMENT '省份编号' ,`city_name` varchar (25 ) DEFAULT NULL COMMENT '城市名称' ,`description` varchar (25 ) DEFAULT NULL COMMENT '描述' ,KEY (`id` )ENGINE =InnoDB AUTO_INCREMENT=1 DEFAULT CHARSET =utf8;
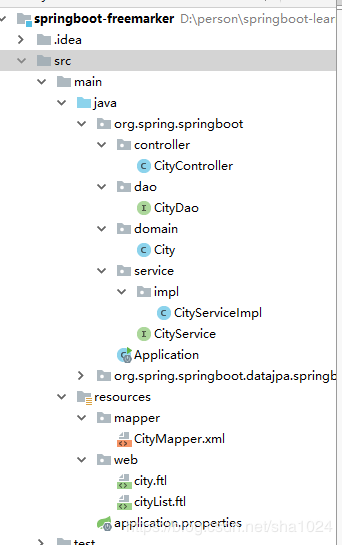
项目结构介绍 1 2 3 4 5 6 org.spring .springboot .controller - Controller 层.spring .springboot .dao - 数据操作层 DAO.spring .springboot .domain - 实体类.spring .springboot .service - 业务逻辑层.properties - 应用配置文件,应用启动会自动读取配置(数据库配置文件)
具体实现代码 controller
1 2 3 4 5 6 7 8 9 10 11 12 13 14 15 16 17 18 19 @Controller public class CityController @Autowired private CityService cityService;@RequestMapping(value = "/api/city/{id}" , method = RequestMethod.GET) public String findOneCity(Model model, @PathVariable("id" ) Long id) {"city" , cityService.findCityById(id));return "city" ;@RequestMapping(value = "/api/city" , method = RequestMethod.GET) public String findAllCity(Model model) {"cityList" ,cityList);return "cityList" ;
dao层
1 2 3 4 5 6 7 8 9 10 11 12 13 14 15 16 17 18 19 20 21 22 23 24 @Repository public interface CityDao @Param("id" ) Long id);Long saveCity(City city);Long updateCity(City city);Long deleteCity(Long id);
实体类
1 2 3 4 5 6 7 8 9 10 11 12 13 14 15 16 17 18 19 20 21 22 23 24 25 26 27 28 29 30 31 32 33 34 35 36 37 38 39 40 41 42 43 44 45 46 47 48 49 50 51 52 53 54 public class City {private Long id;private Long provinceId;private String cityName;private String description ;public Long getId() {return id;public void setId(Long id) {this .id = id;public Long getProvinceId() {return provinceId;public void setProvinceId(Long provinceId) {this .provinceId = provinceId;public String getCityName() {return cityName;public void setCityName(String cityName) {this .cityName = cityName;public String getDescription() {return description ;public void setDescription(String description ) {this .description = description ;
service业务逻辑层1 2 3 4 5 6 7 8 9 10 11 12 13 14 15 16 17 18 19 20 21 22 23 24 25 26 27 28 29 30 31 32 33 34 35 36 37 38 39 40 41 public interface CityService List <City> findAllCity();Long id);Long saveCity(City city);Long updateCity(City city);Long deleteCity(Long id);
业务实现
1 2 3 4 5 6 7 8 9 10 11 12 13 14 15 16 17 18 19 20 21 22 23 24 25 26 27 28 29 30 31 @Service public class CityServiceImpl implements CityService @Autowired private CityDao cityDao;@Override public List<City> findAllCity(){return cityDao.findAllCity () @Override public City findCityById (Long id) {return cityDao.findById (id) @Override public Long saveCity (City city) {return cityDao.saveCity (city) @Override public Long updateCity (City city) {return cityDao.updateCity (city) @Override public Long deleteCity (Long id) {return cityDao.deleteCity (id)
pom文件
1 2 3 4 5 6 7 8 9 10 11 12 13 14 15 16 17 18 19 20 21 22 23 24 25 26 27 28 29 30 31 32 33 34 35 36 37 38 39 40 41 42 43 44 45 46 47 48 49 50 51 52 53 54 55 56 <parent > <groupId > org.springframework.boot</groupId > <artifactId > spring-boot-starter-parent</artifactId > <version > 1.5.1.RELEASE</version > </parent > <properties > <mybatis-spring-boot > 1.2.0</mybatis-spring-boot > <mysql-connector > 5.1.39</mysql-connector > </properties > <dependencies > <dependency > <groupId > org.springframework.boot</groupId > <artifactId > spring-boot-starter-freemarker</artifactId > </dependency > <dependency > <groupId > org.springframework.boot</groupId > <artifactId > spring-boot-starter-web</artifactId > </dependency > <dependency > <groupId > org.springframework.boot</groupId > <artifactId > spring-boot-starter-test</artifactId > <scope > test</scope > </dependency > <dependency > <groupId > org.mybatis.spring.boot</groupId > <artifactId > mybatis-spring-boot-starter</artifactId > <version > ${mybatis-spring-boot} </version > </dependency > <dependency > <groupId > mysql</groupId > <artifactId > mysql-connector-java</artifactId > <version > ${mysql-connector} </version > </dependency > <dependency > <groupId > junit</groupId > <artifactId > junit</artifactId > <version > 4.12</version > </dependency > </dependencies >
application.properties
1 2 3 4 5 6 7 8 9 10 11 12 13 14 15 16 17 18 19 20 21 url =jdbc:mysql://localhost:3306/springbootdb?useUnicode=true&characterEncoding=utf8username =rootpassword =123456driver-class-name =com.mysql.jdbc.Driverauto =create-droptypeAliasesPackage =org.spring.springboot.domainmapperLocations =classpath:mapper/*.xmltemplate-loader-path =classpath:/web/cache =false charset =UTF-8check-template-location =true content-type =text/htmlexpose-request-attributes =true expose-session-attributes =true request-context-attribute =requestsuffix =.ftl
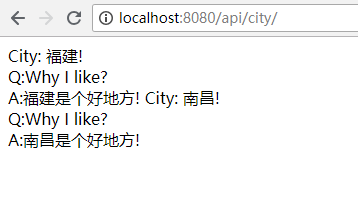
页面效果 具体的页面可以结合前端框架